Physical Therapy Exercises for Ankle Sprains Published On Jan. 17, 2019 Ankle injuries can occur any time of the year. A bad ankle sprain is typically treated with Rest, Ice, Compression and Elevation (RICE). You may be prescribed crutches to minimize weight bearing and start rehab with range of motion exercises within 72 hours of the injury. This blog identifies several exercises you can do to strengthen your ankle. You can find these exercises (and many more) in the Ankle & Foot category in the PT-Helper mobile app to add to your Favorites which allows you to customize each exercise’s repetitions, sets, and hold time. You can also set up 3 daily reminders to notify you when to do your exercises.
Reminder: Please consult your physician or physical therapist before engaging in any physical activity and stop if you experience pain or discomfort.
Published On Jan. 10, 2019
You can also use PT-Helper's mobile app camera feature to record your patients doing their exercises while giving verbal cues on how to do it properly. Since these pictures or videos are not exported by PT-Helper, they will remain private on the patient’s phone. These pictures and videos remain attached to the patient's prescribed exercises so that they are easy to find and view before doing their exercises.
Low Back Stretches Published On Jan. 3, 2019 By guest blogger Joane Chamberlain, PT, MOMT Joane recommends and demonstrates lower back stretches to align your spine and level your pelvis. You can find the Hip Flexor Stretch and the Quadratus Lumborum Stretch in the Lower Back category of the PT-Helper exercise library. Reminder: Please consult your physician or physical therapist before engaging in any physical activity and stop if you experience pain or discomfort.
Subscribe to the PT-Helper Blog here so you don’t miss these helpful compilations and BONUS, you’ll receive Our Secret Guide, unveiling the secrets your patients are keeping from you.
Growing up, winter was basketball season and now makes me think of sprained ankles. I believe that this is caused by my bad ankle sprain in a pre-season high school scrimmage where I landed on a friend’s foot after taking a shot. Back in the day (late 1970s), treatment consisted of an x-ray followed by putting my foot in a cast for 4 weeks even though I did not have a fracture. Once the cast was removed, I was allowed back on the court to start practicing with the team without having to do any rehab. Thank goodness for Coach MacDonald’s ankle tape job!
Nowadays, a bad ankle sprain is typically treated with Rest, Ice, Compression and Elevation (RICE). You may be prescribed crutches to minimize weight bearing and start rehab with range of motion exercises within 72 hours of the injury.
An ankle injury can increase the risk of re-injury by 40% to 70%. (I can personally attest to this.) It is important to strengthen and stretch your ankle to avoid a future chance of re-injury. Your physical therapist will recommend the best exercises for your injury.
Laura Inverarity, PT, DO (Doctor of Osteopathic Medicine) has recommended some exercises on the Verywell website.
Reminder: Please consult your physician or physical therapist before engaging in any physical activity and stop if you experience pain or discomfort.
Ankle Pumps - While sitting or lying down, pump your ankles up and down.
Ankle Alphabet - While sitting or lying down, trace the alphabet in the air with your toes.
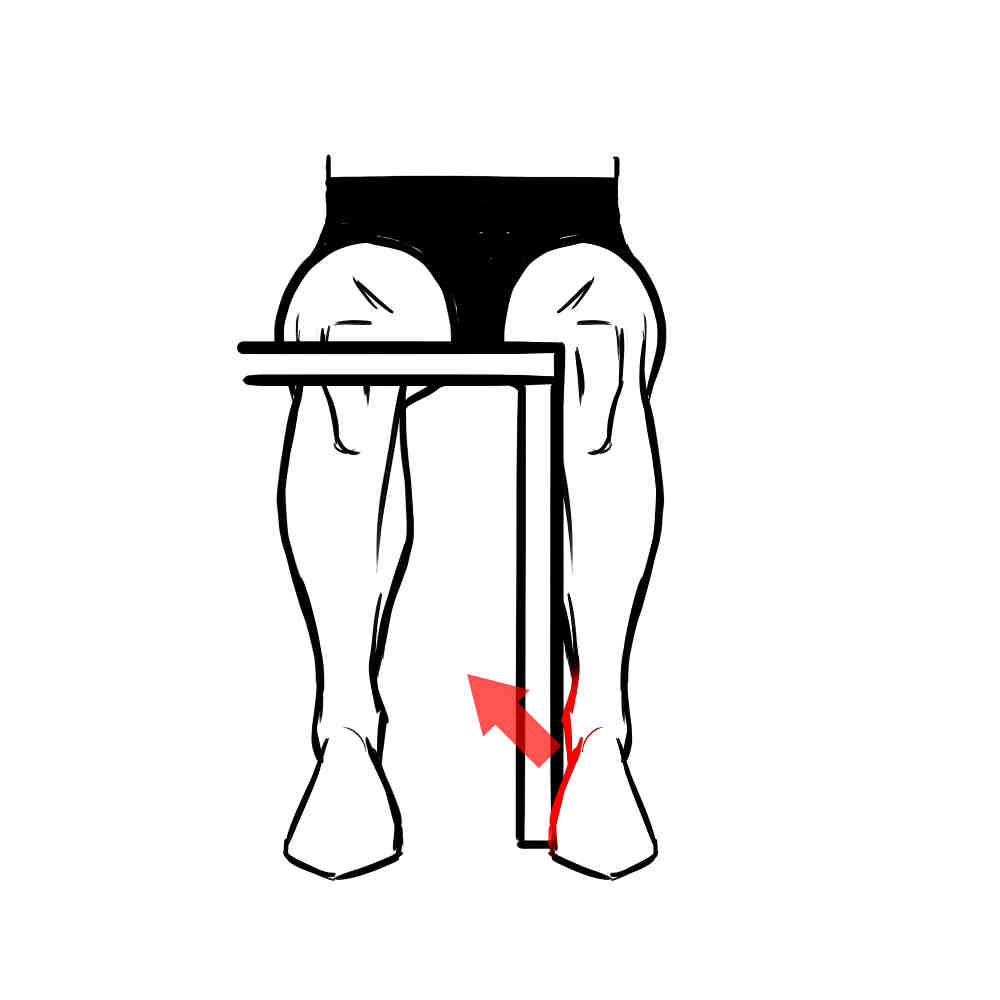
Ankle Isometric Inversion - While sitting, place inside of foot next to a stationary object like a doorway or table leg. Push inside of foot against stationary object. Slow on and slow off. Must be pain free!
Theraband Eversion - Tie a loop in the band and place it around your affected foot. Pull the band around your other foot and hold tightly. Turn your affected foot out without rolling your leg, moving only at the ankle joint.
Balance on One Leg Flatfooted - Stand on your affected leg with the other leg bent and off the floor. Balance for up to 15 seconds. Use a table or chair beside you if too difficult. Advance to eyes closed if it becomes easy.
You can find these exercises (and many more) in the Ankle & Foot category in the PT-Helper mobile app to add to your Favorites which allows you to customize each exercise’s repetitions, sets, and hold time. You can also set up 3 daily reminders to notify you when to do your exercises.
Reminder: Please consult your physician or physical therapist before engaging in any physical activity and stop if you experience pain or discomfort.
Start your Free 30-day Trial of the PT-Helper CONNECT service for physical therapists and other wellness professional, to prescribe Home Exercise Programs.
Download the PT-Helper mobile app for patients and exercise enthusiasts to create your exercise program.
One of the more interesting responses that we get when we ask physical therapists “how do you prescribe exercises to your patients?” is “I use my patient’s phone and record them doing their exercises”. In many ways this is a great example of the therapist using the available tools to inform and individually customize their patient’s exercises.
With this behavior in mind, we have added the ability to add pictures and videos taken on the patient’s phone to prescribed exercises in the PT-Helper mobile app.
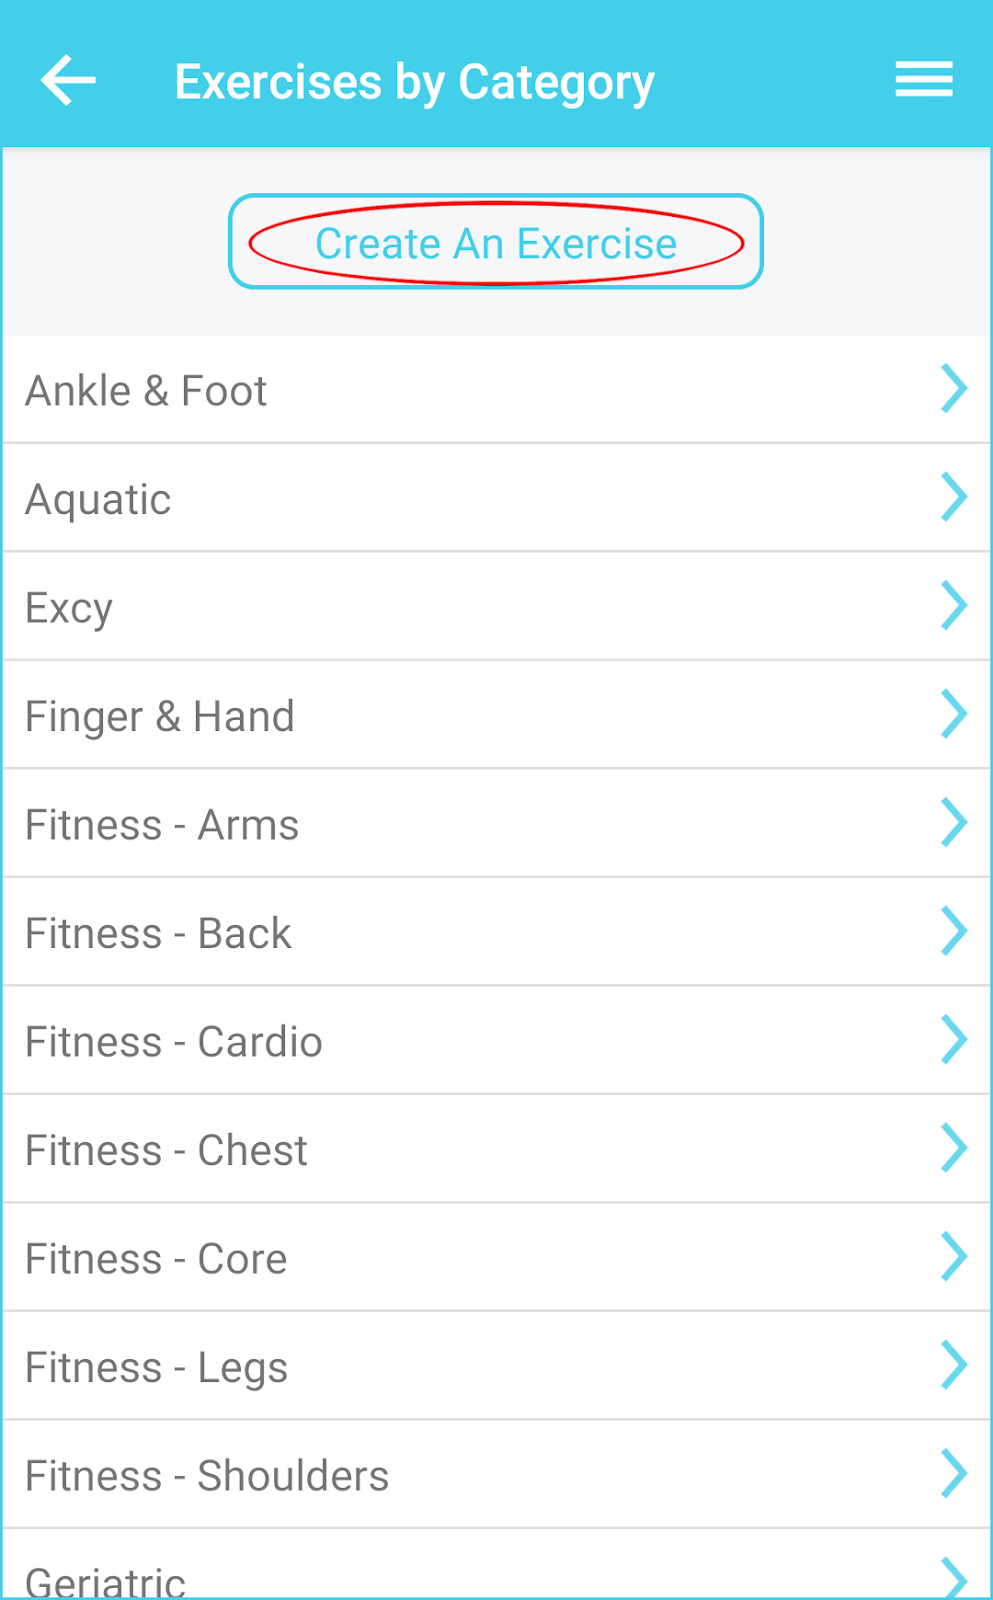
The PT-Helper mobile app provides a quick and easy way to view and select exercises from our library. From the app home page, select “Exercises by Category” to view the available categories of exercises. Select the appropriate category, in this example Shoulder, to view the list of available exercises.
Scroll up and down the list to select the appropriate exercise, such as Bilateral Shoulder External Rotation. Then select Add To Favorites. Once any exercise is added to Favorites, you can use the camera symbol located at the top left of the screen to take pictures or videos. You can take videos of your patient doing their exercises while giving verbal cues on how to do it properly. Since these pictures or videos are not exported by PT-Helper, they will remain private on the patient’s phone.
In the scenario where an exercise doesn’t currently exist within the library, you can easily create a new exercise within the app by selecting Create An Exercise and then adding photos or videos to the new exercise.
As long as they have their smartphone, your patients will have access to their prescribed exercises. No more excuses of losing their exercise sheets. PT-Helper mobile app also has up to 3 daily reminders so that your patients don’t forget when to exercise.
Watch the short how-to video below to learn how to add pictures or video to the PT-Helper mobile app.
Start your
Free 30-day Trial
of the PT-Helper CONNECT service for physical therapists and other wellness professional, to prescribe Home Exercise Programs.
Download the PT-Helper mobile app for patients and exercise enthusiasts to create your exercise program.
The most effective things that you can do at home to decrease low back and neck pain is to do the back stretches and strengthening exercises that align your spine and level your pelvis.
The muscle that pulls the left side of your spine and pelvis out of alignment and causes left sided back pain (and may radiate into your left leg) is the quadratus lumborum muscle. It attaches to your lowest rib, lumbar spine and top of your pelvis (iliac crest).
In order to stretch it you need to stretch your left arm over your head and lean to the right, this stretch is demonstrated in the DVD, “The Missing Link to Neck and Back Pain Relief.” This stretch can help relieve left sided low back pain and sciatic pain in the left leg.
The muscle that pulls the right side of your low back and pelvis out of alignment and causes right sided back pain (which may also refer into your right leg) is the right hip flexor, the iliopsoas muscle. It attaches to all of the lumbar vertebrae, lumbar discs and then runs forward to attach to the front on your hip bone (femur). The iliopsoas muscle when tight and spasmed is very powerful for compressing your lumbar spine, pulling the right side of your pelvis out of alignment and contributing to herniated discs. It is commonly shortened in many of us because we tend to sit too much. This muscle is stretched with a lunge stretch by kneeling down, placing your left leg in front of you and leaning forward, keeping your shoulders up. This is a common yoga pose. This stretch is also demonstrated in the DVD,”The Missing Link to Neck and Back Pain Relief.” It can relieve right sided low back pain and sciatic or radiating pain into the right leg.
When you have pain that is centered in the lumbar spine you probably need to do both of these stretches. Stretching the right quadratus lumborum muscle or the left iliopsoas muscle will not hurt you, but will not help to relieve your pain. One needs to stretch the left quadratus lumborum and the right iliopsoas muscle to relieve pain and align the spine and pelvis.
Modalities like hot packs and cold packs will only treat your symptoms temporarily. If you are in the middle of herniating a disc (an acute disc disruption) a hot pack can actually hurt you, why is that? The nucleus pulposus is the jelly fluid that leaks out of your disc and herniates through the outside layer (the annulus fibrosis). The nucleus imbibes (attracts) fluid to itself so that under normal conditions the discs can hydrate and stay plump. However, when the disc is herniating and leaking through the outside layer of ligamentous tissue this imbibing action can cause the herniation to grow and increase the chances of nerve pain, etc. It is always safer to stick to cold packs.
If you have pain that is radiating past the level of your buttocks, it is best to be evaluated by a professional to make sure you are not herniating a disc, as it may not be safe to do any back stretches at that time.
About Joane Chamberiain, PT, MOMT (Master’s Orthopedic Manual Therapy)
Joane is the founder of
Challenge Physical Therapy, Inc. in Thousand Oaks, California, the creator of “The Missing Link to Neck and Back Pain Relief” program (available as downloadable video), and lecturer / educator at hospitals, foundations and physical therapy clinics.
Joane came to the valuable discovery of how pelvic dysfunctions are a major factor in causing spinal pain through her own personal experience with back pain. She discovered how pelvic issues can be the underlying cause of neck, mid back and low back pain as well as many other potentially debilitating physical conditions. Her training in orthopedics and manual therapy, combined with her knowledge of treating the pelvis and spine, makes her an expert at eliminating pain and dysfunction throughout her patient’s bodies. She applies her expertise in orthopedics and manual techniques to treat all of the joints and pain throughout the body. Joane’s unique approach empowers patients to reduce their pain and rid their limitations, allowing them to resume the activities they love.
In 1981 Joane earned her Bachelor’s Degree in physical therapy from Mount St. Mary’s College in Los Angeles, California, and trained with pelvic specialist, Dr. Alec Thompson through 1988. She completed her Master’s Degree in Orthopedic Manual Therapy at the Ola Grimsby Institute, also in Los Angeles, in 1995.
After working as a physical therapist for over 20 years in the areas of orthopedic out-patient clinics, rehab, skilled nursing, home health, and acute care hospitals, Joane opened Challenge Physical Therapy in Thousand Oaks, California in 2000. Bringing the highest quality, most effective, cutting-edge treatments and empowering her patients with the ability to create a pain-free life are the hallmarks of her practice.
Start your Free 30-day Trial of the PT-Helper CONNECT service for physical therapists and other wellness professional, to prescribe Home Exercise Programs.
Download the PT-Helper mobile app for patients and exercise enthusiasts to create your exercise program.
It’s almost the end of 2018 and time when many people create a New Year’s resolution. According to Wikipedia, a New Year’s resolution is when “a person resolves to change an undesired trait or behavior, to accomplish a personal goal or otherwise improve their life.” For many people in the U.S., their New Year’s resolution will include getting fit or losing weight to improve their health.
Succeeding in your fitness goals can be improved if you find an activity that you enjoy. In my family, we have a tennis player, a power lifter, pickleball player, tai chi participant, and cyclist. Although we all have our different activities, we have friends that we’ve met through our activities that help motivate us to continue to stay involved. Scheduling activities with friends and family creates additional motivation to show up. Participating in a tennis league, meeting friends at the gym, or planning a group ride also adds a level of competition that can help improve your skills and fitness.
Fitness can also be gained with other activities like walking or dancing. This video of Toni Basil dancing at age 74 is just incredible.
According to the Washington Post, 58% of U.S. adults never do any muscle strengthening exercises. As a result, taking baby steps are important to making progress towards a healthier you. This article 22 New Year’s Resolution Ideas That Will Make 2019 Your Best Year Yet suggests breaking down your resolution into smaller goals such as focusing on your core.
You can do exercises such as:
Plank on Elbows - Lie on your stomach with your forearms resting on the ground by your side. Tighten your quads to keep your legs straight. Tighten your abdominal muscles and raise your body by pushing up on the floor so that only your forearms and toes are touching the ground. Keeping your body straight, hold your position. Lower yourself back to the floor. Relax and then repeat. Don’t forget to breathe while holding your position.
Side Plank with Knees Flexed - Lie on your side with your lower forearm supporting your upper body. Your knees should together and bent at 45 degrees. Place your upper arm along the side of your body. Tighten your quads and abdominal muscles, raise your hips off the floor. Hold. Lower your hips back to the floor, relax and then repeat. Don’t forget to breathe while holding your raised position.
Bridge - Lie on your back with both knees bent, feet flat on the floor and arms at your side. Engage your abdominal muscle then raise your hips up trying to make a straight line from shoulders to knees. Hold then lower down slowly keeping abdominals tight.
Hand and Knee Balance (Bird Dog) - Position yourself on your hands and knees, with arms shoulder width apart and knees slightly apart. Tighten your abdominals, raise one arm and opposite leg slowly until they are horizontal. Keep hips even and back flat. Hold. Return to starting position and relax. Repeat with opposite arm and leg.
Dead Bug - Lie on your back with your arms extended in front of you as if you are reaching for the ceiling. Bend your hips to 90 degrees then bend your knees to 90 degrees. Flatten your back onto the floor, rotating your pelvis up. Tighten your abdominal muscles. Extend one leg, straightening the knee and hip to drop the leg just above the ground. Simultaneously drop the opposite arm above your head just above the ground. Make sure to keep your back flat on the floor. Return to the starting position. Repeat with the opposite side.
You can find these exercises in the Fitness - Core category in the PT-Helper mobile app to add to your Favorites which allows you to customize each exercise’s repetitions, sets, and hold time. You can also set up 3 daily reminders to notify you when to do your exercises.
Reminder: Please consult your physician or physical therapist before engaging in any physical activity and stop if you experience pain or discomfort.
Start your Free 30-day Trial of the PT-Helper CONNECT service for physical therapists and other wellness professional, to prescribe Home Exercise Programs.
Download the PT-Helper mobile app for patients and exercise enthusiasts to create your exercise program.
Shoulder exercises are among the most commonly searched exercises in Google when compared to exercises of other body parts.
In 2006, about 7.5 million people in the US went to the doctor for shoulder problems with more than 4.1 million of these visits for rotator cuff problems. According to the American Academy of Orthopedic Surgeons, shoulder injuries are often caused by repetitive motion activities such as swimming, tennis or weightlifting. Shoulder injuries can also be caused by regular daily activities. An unusual example is when a good friend injured his rotator cuff while on a Mighty Mouse amusement park ride: he had his arms up in the air when the car took a sharp turn causing a high lateral G-force whipping his arms to the side while his body moved in a different direction. Ouch!
The shoulder is the most movable joint in our body but can also be unstable because the ball of the upper arm is larger than the shoulder socket that holds it. To remain in a stable or normal position, the shoulder must be anchored by muscles, tendons, and ligaments. Common problems according to the US National Library of Medicine include
Sprains and strains
Dislocations
Separations
Tendinitis
Bursitis
Torn rotator cuffs
Frozen shoulder
Fractures
Arthritis
Rest, Ice, Compression and Elevation (RICE) is often the first treatment for shoulder problems. However, prolonged rest or lack of motion in your shoulder can lead to a Frozen Shoulder. The Cleveland Clinic recommends that the “chance of a frozen shoulder can be prevented or at least lessened if physical therapy is started shortly after any shoulder injury in which shoulder movement is painful or difficult”.
The American Academy of Orthopedic Surgeons shares some example stretches that can be done at home to help with a frozen shoulder. Variations of these can be found in PT-Helper’s exercise library.
Wand External Rotation - While lying on your back, hold a wand with your involved side palm up and un-involved side palm down, elbows bent. Using your un-involved hand, move the wand away from your body while keeping your elbow of your involved side at your side until you feel a stretch. Hold then pull the staff back across your body back to your starting position. Hold then repeat.
Active Assisted Supine Flexion - While lying down on your back, grasp your hand or forearm with your opposite hand. Raise arms up and overhead as far as comfortable to feel a stretch in the affected shoulder. Hold, then return to starting position.
Posterior Capsule Stretch - Cross one arm over your body and grasp at elbow with opposite arm. Gently pull hand towards opposite shoulder. Hold, then gently release. Your therapist may advise you to perform laying on your side, or leaning against a wall. Do not perform this exercise if you feel a sharp pinch in the front of your shoulder. Stretch should be felt in the back of your shoulder.
You can find these exercises in the Shoulder category in the PT-Helper mobile app to add to your Favorites which allows you to customize each exercise’s repetitions, sets, and hold time.
Reminder: Please consult your physician or physical therapist before engaging in any physical activity and stop if you experience pain or discomfort.
Start your Free 30-day Trial of the PT-Helper CONNECT service for physical therapists and other wellness professional, to prescribe Home Exercise Programs.
Download the PT-Helper mobile app for patients and exercise enthusiasts to create your exercise program.
One of the most common areas we see individuals report injuring, and we’d argue any physical therapist or CrossFit coach/trainer, is the low back!
In fact, most research shows that throughout a lifetime, the prevalence of non-specific low back pain is estimated at 60%-70%. That means if you take a look around your own CrossFit box, 60-70% of your fit fam will experience low back pain during their lifetime. A study in 2012 showed that in the United States alone, there were approximately 2 million incidents of low back pain in one year!
Why do we share that? Because we want to make sure that you know that, well…”stuff” happens and sometimes you get hurt. But! We want to make sure you know that there are people out there make it their goal to help you get better, reduce your pain, move better, perform better and ultimately help make you a stronger more resilient athlete.
That’s where CrossPhysio comes in! If you CrossFit long enough, chances are high you may feel the occasional ache and pain. Unfortunately, you may also experience an injury. The following exercises are three of our favorite exercises to help you get back following a back injury and reduce the risk of injury from occurring.
**Let us start by quickly mentioning that these exercises are not a fix-all strategies. Pain and injuries are complex and we do not claim that these alone will help with all that you may be dealing with currently. If you are injured, please seek the advice and guidance of a rehab professional if you are concerned with the extent of an injury or your pain**
Bird Dog
The bird dog is one of our favorites for a variety of reasons. It can be performed easily with no equipment. It teaches proper positioning and stabilization of the spine with both arm and leg movement. And it is so much more than just a “back exercise”.
The Bird Dog incorporates spinal stability, scapular stability, rotary stability, glute activation and abdominal/core activation. It’s a full body exercise designed to get you moving well and improve your body awareness. Not to mention, there are A TON of variations that can be performed to make these harder depending on where you are in your progress following an injury.
Who knows…maybe we’ll post about those some day too!
Dead Bug/Bent Knee Hollow Holds
CrossFit heavily impresses upon the concept of “core-to-extremity movement”. If you’ve never heard that before, simply put, it’s means starting any movement by fully engaging the muscles in your “core” – ie. the glutes, hips, lats, abdominal musculature – before transferring forces outward to the arms and legs – Or, as Kelly Starret of MobilityWOD puts it: “getting organized prior to performing any movement.”
We love it because, just like anything in CrossFit, it is scalable for wherever you are in your rehab or fitness journey. Whether first learning to stabilize your midline, progressively increasing tolerance to loading the midline after an injury, or just looking to challenge yourself and work up a great sweat – and believe us, you definitely can – this one is money in the bank.
Farmer’s Carry
That’s right. Farmer’s carry. Probably one of the simplest exercises you can think of, yet, oh so wonderful, difficult and complex when you need it to be!
If you practice these and its variations frequently, you’ll be blown away by the benefits it will have for your ability to lift heavier loads and carry those groceries into your home in one trip (and let’s be honest…that’s really the reason we all CrossFit).
Grip strength, increased pulling strength, improved work capacity, develop athleticism, overall gainz and – the biggest reasons we think these are pivotal for low back rehab and in building up your resiliency to injury – postural strength/control and enhanced core stabilization/bracing.
About Dr. Guillermo Contreras, PT, DPT, CF-L1, Cert-CMFA
Doctor of Physical Therapy, CrossFit Level 1 Trainer, Certification in Clinical Management of the Fitness Athlete, Certified HawkGrips Practitioner, Functional Movement Techniques Certified
Dr. Contreras has been immersed in the rehab and performance world for over 10 years. Weightlifting for sports, aesthetics and strength since the age of 14, the affinity for strength and performance has always driven his passion for resistance training, movement and mobility. Those passions drive the way he designs his rehab programs and trains and coaches all clients. Whether for sport or life, the principles of safe efficient movement and strength can be applied to all individuals seeking to lead a healthy active lifestyle. He draws not only upon his own experiences, but also years of geeking out on written articles, watching seminars, countless youtube videos and unending Instagram posts filled with knowledge and expertise from professionals in the rehab and fitness community he respects and values for their work.
Graduating from Marquette University with a Bachelors of Science in Exercises Physiology, University of Wisconsin-Madison as a Doctor of Physical Therapy, and a CrossFit Level 1 trainer, he possesses a wealth of knowledge and firm educational foundation to work with all individuals seeking to improve their movement and strength, decrease pain, or lead a healthier lifestyle. He is passionate about strength training, sports performance, mobility and most of all, CrossFit!
We’ve added these exercises into a Home Exercise Program (HEP) using the PT-Helper CONNECT platform and presented on the PT-Helper mobile app. These sample exercises can be quickly downloaded into the PT-Helper mobile app using
HEP code: A7B54B9
You can also find these exercises in the Lower Back category in the PT-Helper mobile app to add to your Favorites which allows you to customize each exercise’s repetitions, sets, and hold time.
Reminder: Please consult your physician or physical therapist before engaging in any physical activity and stop if you experience pain or discomfort.
Start your Free 30-day Trial of the PT-Helper CONNECT service for physical therapists and other wellness professional, to prescribe Home Exercise Programs.
Download the PT-Helper mobile app for patients and exercise enthusiasts to create your exercise program.
 to record your patients doing their exercises while giving verbal cues on how to do it properly. Since these pictures or videos are not exported by PT-Helper, they will remain private on the patient’s phone. These pictures and videos remain attached to the patient's prescribed exercises so that they are easy to find and view before doing their exercises.